By Tina Sauer Harshbarger
PM me with ?'s comments or edits
This will walk you through creating pillowcase-style fleece pan/cage liners for a ferret or critter nation. You will end up with 2 full-size pan/cage liners and 2 half-size pan/cage liners. It is possible to use this for other pan/cage liners, but you will need to take your own cage measurements as follows:
Measure the depth (front to back) of your pan/cage then add 2"/5cm for seam allowance. Next measure the width (side to side) of your pan/cage, then add 8"/20cm for seam allowance and extra fleece to tuck under.
Supplies Needed
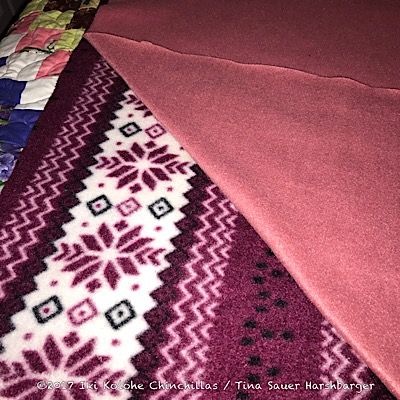
- 2 yards of a patterned of 58/60" Anti-Pill/Blizzard/Polar Fleece (Online Fleece)
- 2 yards of a coordinating solid of 58/60" Anti-Pill/Blizzard/Polar Fleece (Online Fleece)
- Scissors/Rotary Cutter
- Sewing Machine
- Tape Measure
- Scissors
Step 1 - Cutting
(I will add photos of this the next time I cut fleece out)
Your fleece will come with the selvages both on 1 side, measuring 30" x 72" folded. You'll want to unfold it, and refold it from end to end, so you'll end up with it 60" wide and 36" long folded in half.
Once folded correctly, cut TWO 25" wide strips (so 25" x 72" unfolded). From each of those strips, you need to cut ONE 40" piece (final measurement would be 25" wide by 40" long). From the leftover piece of that strip, cut ONE 21" x28". Repeat with the second strip.
Repeat with the solid color fleece.
You should now have:
- Two 25"x40" Patterned Fleece
- Two 21"x28" Patterned Fleece
- Two 25"x40" Solid Fleece
- Two 21"x28" Solid Fleece
Step 2 - Laying Out
Take your 4 pieces of patterned fleece and lay them out, right side up. There is a right side to fleece
(has to do with which way it curls), but really, just pick which side you prefer, one is usually
fuzzier/blurrier than the other.
On top of each patterned fleece, lay the corresponding piece of solid fleece, right side down. Pin
together down both long sides and 1 short side.
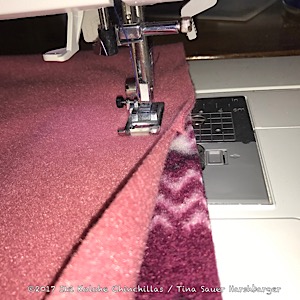
 Step 3 - Sewing
Sew 1" in from the edge along the 3 sides you've pinned. To make your sewn ends stronger, I always
reverse stitch for 1" - so when I start, I place the fleece 2" in from the needle, sewing backwards (there's
a button or lever to make your machine go backwards) for 1", then sew forward again, making the first
inch double sewed. When I get to the end, I reverse stitch for 1", again, causing the last inch to be
double sewn. Once sewn, you will need to trim your top & bottom thread as close to the fleece as you
can. Both from where you started and from where you ended.
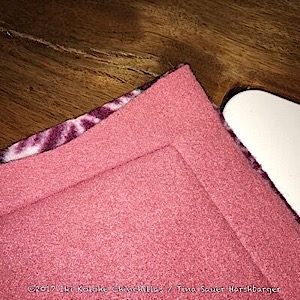 Step 4 - Completing
Now reach inside and grab ahold of the short edge that's sewn, pulling it out so now your seams are
inside. To use, simply slide your pan in like it was a pillow,tucking the extra fleece at the open end
under, then slide your covered pan into the cage.
Repeat Steps 3 & 4 with your other 3 sets of fleece.
DIY Projects
|